Welcome to the most exciting and educational article on M code introduction. If you are a data enthusiast, then one or two skills in data analytics are not enough and you should always look forward to learning more skills to make yourself better competent in the data field.
Many students ask me what is the M code in power query and why do we need to learn when the work can be done through power query itself. You are lucky if your work can still be managed by Powerquery because real world of data reporting is not so soft and straight. I have personally seen especially in IT/Telecom/Bpo sectors where the data is so huge and it is never in the structured form. It’s always a super messy data -the most cruel data and while dealing with this type of data you will face many difficulties to restructure it , to transform it into a meaningful data. That is where you find even Powerquery is not helpful.
This is where you will need to use M code which is the enhanced version of a power query.
Let me give you one example. You know as we’ve VBA in excel to automate data , in the same way power query has M code through which we can do super powerful data transformations easily but note Mcode has no similarities with VBA technically. Both are very different but both helps in data transformation in their own way.
Topics we are covering in it.
What is the M code in PowerQuery.
Why M code is also called a Functional Language.
What is an Advance Editor.
Rules to remember in Mcode
How to write M code (Data transformation to a new level)
1. What is M Code in Power query
First of all, before you learn the M code, you must learn the powerquery at a good level. For this you can refer to the powerquery articles under PowerQuery blog section.
So in M code, M stands for Mash-up. You know mash up means crushing items and make it softer. In the same way M code helps in beating up the bad data and turn it into an easy ,presentable data. In Power query, we connect the different data sources with each other and mash them up. Hence it’s called Mashup language.
M code is the behind the scenes of Powerquery and we can do many data transformations in Powerquery by writing the M code. Mcode simply means taking the control from powerquery and writing the functions/syntaxes by ourselves.
Many things are impossible using Powerquery ribbon so that is why we need M code. The art of writing the functions.
2. Why M code is also called as functional language
M code is also considered as a functional language due to the use of functions in every action that we do while performing data cleaning and transformation.
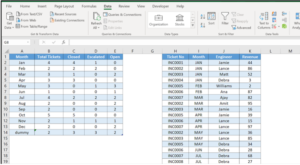
So let’s understand this with the help of an example. We have a dataset as shown in below tables which we have created with the help of Power Query.
Now let’s launch the power query editor.
We can select on the Data tab then Get Data and Launch Power Query Editor.
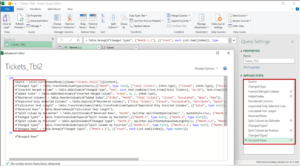
Afterwards, we will get the below page in which we have already created a power query.
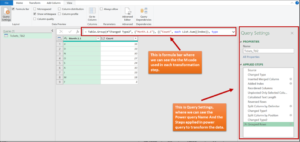
In the above picture we can see the Query Settings and Formula bar.
In Query Settings we can see the Name of the Power Query i.e., “Tickets_Tbl2” and the Applied Steps where we can see the steps we have used to transform the data and whenever we do any transformations in powerquery the steps get added automatically. For now, I have selected the last step “Grouped Rows” which is our final output, and we can see the Formula Bar where the function is written for the transformation. So, there are two places where we can write or edit the M code i.e., Formula Bar and Advance editor. When we create any step into a power query, we can see the M code of that step in the formula bar.
If you cannot see the formula bar, you can go to the View tab and then check the Formula Bar option if unchecked.
We will explore the advanced editor in our next topic.
Now let’s understand why M code is called a functional language. So, as we have seen in the Query Settings and Applied steps tab, let’s try to select any step and explore the formula bar.
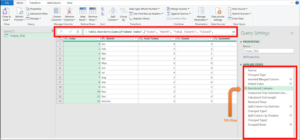
As we can see in the above picture, we have selected the 2nd step in which is “Changed Type” and the function which is used in the formula bar is “Table.TransformColumnTypes” which means that it has changed the Type of the column. Let’s suppose if any column has a Text format type and then we changed the format of that column into the Number Format Type. So, to do that we will need to use the “Table.TransformColumnTypes” function. Now just to understand more I will select another step and we will explore that step.
Now we have selected the 5th step which is “Reordered Columns” and the function which is used in the formula bar is “Table.ReorderedColumns” and the function itself says that it will reorder the columns. Let’s suppose Column D is on 4th number when we move column D to 1st number then we have reordered column D so we can use that function to reorder the column.
So, as we see whenever we select any step, the step has a function used to complete the step and these functions are inserted automatically by Powerquery based on our action. So,it means whenever we take any action on data , it picks the relevant function from its pocket and use it.
Whether you add columns, remove columns, or do any sort of transformation in Powerquery then desired function will be used to complete the transformation and hence due to use of these functions the M code is also called Functional Language. There are many functions used in M code for transformation and it depends on you how many functions you know. The more functions you know in M code, the more you will become an expert in M code. Hope, till now all going good with you. 😊😊
3.What is the Advance Editor in Powerquery?
Now as you see in above picture that we have created many steps in power query and whenever we click on any step the function used to complete that step is visible in formula bar so you may have question that Can we see all steps somewhere at one place? For e.g., when we create a code in VBA or Python we can see the steps and code lines in it. So answer is , yes we too have an Advance Editor in Powerquery where we can see all the steps that are used for transformations.
Advanced editor is a feature where you can view all the steps which are used to do the transformations and it allows users to directly edit the M code for the Power Query. You can do basic transformations like filtering, sorting, and combining the data through Power Query however if you need more complex operations then you directly edit or create the M code in advance editor. If you have created any power query the whole story of that power query is viewable in Advance Editor. Now, the formula bar which we have seen in the above shown pictures can show the M code for the step we have selected currently, however in the advanced editor, you can see and edit the M code for the entire Power query.
Now let’s see an advanced editor. You can go on View tab and select advanced editor, or you can see the advanced editor option in Home tab itself as shown below.
Now let’s explore the Advanced Editor window by clicking on it.
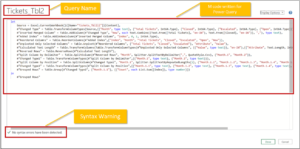
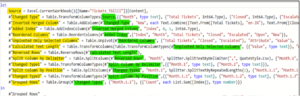
Once it opens, we can see all the M code written to transform the data into Power Query in the above shown picture. Also, the advanced editor has the Name of the Power Query on which we are working (“Tickets_Tbl2”) and it has “let” and “in” blocks where M code has been written.
Now as other programming languages have start points and end points, it is the same with Power Query as well. it has “let” block, where desired functions are written and “in” block we have entered a step name which we want as output as shown above is “#Grouped Rows”.
Now let us explore the “let” and “in” Block to understand it well.
Now as we can see whatever steps we have in the Query Settings and Applied Steps option. The function which is used to perform that step can be viewed in the advanced editor option collectively. Don’t worry, we will explore the functions of M code in detail in our upcoming articles of M code.
Now as we can see in “let” block that previously performed step is used in the next step to transform the data.
i.) The first step is “Source” which always means that here we have a data coming from some source which can be an excel data, text file or database.
if you are wondering why it is called a Source then please understand, it is the Powerquery style. It creates this step name always whenever you import the data into Powerquery. And, this is also very useful for us because after working on data for some time, you get familiar with these step names due to its standardization. Source is a step name which Powerquery always uses -does not matter which data you are importing. Point is, data is coming in powerquery so it obviously will have a source and hence, it gives it a name called source. We can now say , it means one is the step name and other thing is on that Step name,which formula is used by Powerquery -that can be seen on formula editor provided you have selected that step.
ii.) The second step name is “Changed Type” which is again created by Powerquery and what it does is to observe the data type of each column and then give them a text or number data type as per the nature of values in each column. Are you now following the entire concept here? You see, powerquery creates the steps automatically but if you see carefully the step name is all about the action it has taken on the data. Changed type step means something has changed here . And, we know it is actually a data type change. We can see the formula also that is used here. It is Table.TransformColumnsTypes function.
I hope I am able to explain you everything👍👍. Powerquery world is so fascinating. See, how the step names are given and each step has a function which does the job. When you know Mcode, you can write your own steps. You can give them a name that you want to prefer. And, you can use any formula from its library.
iii.) Similarly in the 3rd step, “you see a step “Inserted Merged Column”. Again, it clearly indicates that some merge has happened between columns. This is how data story keep moving forward until our last step.
Now you must have a question: This all code is a recording of our steps. We did not write anything in the advance editor window. It is all generated automatically. Is it not going to be difficult for us to write such a code by ourselves. Answer is , no. If we go step by step, we will be able to do this easily. Wait for the right time. This is just an introduction. Just focuss on what is being taught here and keep you fears in your pocket and zip it. 😁😁
Again re-iterating myself , If you know the Excel VBA then you must know the Record Macro option where it records all the steps you performed in excel, Similarly Power Query records the steps whenever we do any transformation into data. But to do advanced transformation we should learn the M code well.
4.) Rules to remember & follow (I know, we have not written yet but we will soon)
a.) let is a beginning of a code. After let word ,in the next line we start writing our steps or in recording too ,same follows. You can see the image.
b.) So, now our steps are written. On the left side of = sign, step name comes and after = sign , function is inserted which comes as per the user action.
b.) Every Step here will be ended with a comma sign “,”. Otherwise it will throw an error. Comma at the end means , it is the end of the line.
c.) There is no limit of steps- it depends on how much work we have done on the transformation of a data. The desired output that we want , how many data modifications we had to do. This is a very basic point but still i thought I should write it here.
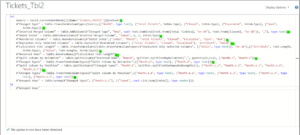
d.) But, the last step of the M code should not have the “,” at the end , Because “,” is used to continue another step but when we have last step of the transformation then we should not use “,”. We can see this in the picture below. See the last line just above “in” section. There is a step name called #”Grouped rows” and it has no comma at the end of it. Last line will never have a comma.
e.) What is the “in” section which is written in the last part of the code. So, “in” section is always there. It means the end of the code. You write “in” keyword & then in the next line, you need to write the step name that you want to return finally in the code. Let me explain you this in a simple way.
You know, we have used many steps or actions in the “let” section and each step has a data story/ data transformation which have happened there. Correct? We can say, that every step is an attempt to reach to our desired output or the final output that we want to see. If there are 14 steps in our code, 14th is the last one & it means this is where we got our final result otherwise there would have been another extra step. So, now once we have achieved the target, we need to tell the Powerquery that this step/result is what we need to see as a final output so that then we can take this data in excel sheet. So, our “in” section does the same job. If you see the below image, you will see the last step name is written over there. if we will not write this or delete this from an editor, it will lead to an error.
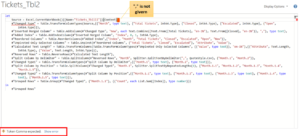
f.) So, you can see at the left bottom corner, there is syntax written automatically – “No syntax errors have been detected”. If you remove any comma from any line or do any fundamental thing incorrect, this line will change to syntax error. So, before we click on ok button, we must see the status here.
As we can see in the above picture, when we missed to enter the “,” after the first step, it gave an error that “Token Comma expected”. But we should not worry because the error itself declares where we are wrong, and then we can correct that error.
So hopefully we are clear about the “let” Block, now when we write the M code into “let” block till the last step and we have reached at the last step that means to the desired output that we want then it’s mandatory to use the last step name into the “in ”Block. As we can see in the above shown picture, in the “in” block the name of the last step is used to ask Power Query to show the desired output.
No matter what action you are doing on data , you are writing the function by yourself on formula bar or recording the steps using Powerquery features, everything will be seen in advance editor like a one shopping mall for all types of shopping requirements.
Gradually, the more articles and examples you will go through, things will make a sense. This is just an introduction. So, Finally we are ready to write our first M code so let’s be excited and write our first M code.
4. Write a M code in Power Query
I am so excited to write the first M code for our article. I hope you are too 😁. We will create a new powerquery to write the M code and to do that we will need to open a blank query which we can open in Data Tab then Get Data > From Other Sources and then select on Blank Query as shown below.
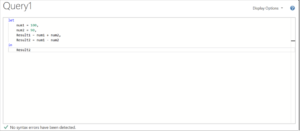
We can view a blank query page then as we will write the code which has more than 1 line or step, we can’t write it into formula bar, so for that we need to open an Advance Editor window as shown below.
As we can see in the above picture, we have written a simple expression of sum.
So, in “let” block my first step is num1 = 100 that mean I have stated num1 equal to 100 then I have entered “,” to write next step which is num2 = 90 and post “,” I have written third step which is Result1 = num1 + num2 that means I want my output which is Result1 equal to sum of num1 and num2.
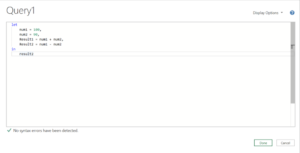
Now as Result1 is my last step, so we have not entered “,” because we are not going to write any step ahead. So now into “in’ block we have entered the step name Result1 which we want the power query to show as output. Let’s click on Done and see the output.
Boom…as we can see the power query has returned the output as 190 which is the sum of num1(100) and num2(90). So now you have stepped in to become a champion in M code. Let’s add another step into the power query and see the result.
So just to explore it more, we have added another step into our existing Power Query. Which is Result2 = num1 – num2. Now my question to you is what should be in the “in” block, is it Result1 or Result2.
I believe you would be thinking it should be Result2 because it’s our last step but it depends on us actually we can enter any step into “in” block as Power Query will never give any issue and it will return that step as output. But most of the time we enter our last step name into the “in” block as we write all M code to transform data as we want till the last step.
So now I have edited the “in” block to the Result2 and I will click on “done”. And here is the result.
So, it has returned the 10 as output which is Subtraction of num1(100) and num2(90).
Also, M code is Case Sensitive hence we should be very careful when we enter any function or any code into M code. Let’s try to understand it with the help of recent examples.
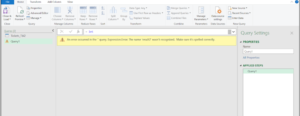
So, in the above picture the Code is the same with last example, but we have made a change into “in” block that we have entered result2 in complete small letters however in “let” block we have as Result2 in which R is capital letter.
Now when we click on “Done” then Power Query will give an error stating that the name “result2” wasn’t recognized. Make sure it’s spelled correctly.
Hence, we must be very careful while entering the functions or any code into the Power query Advanced editor. Hope, you have enjoyed this introduction. More to come…..
Thank you for reading this article. With lots of love and Wishes to you. Happy Learning!👍👍❤️❤️
1 thought on “M code Introduction”
Sir I must admit that you have poured your heart out while explaining. Like you did explain even a tiny things like “,” though this is minor thing in seeing but has potential to ruin the whole written code….
Thank you so much for showing so much dedication while explaining every concept in depth.


Sir I must admit that you have poured your heart out while explaining. Like you did explain even a tiny things like “,” though this is minor thing in seeing but has potential to ruin the whole written code….
Thank you so much for showing so much dedication while explaining every concept in depth.